


How to Begin Financial Tracking
New Year, New tracker! Start today and write the story of your 2023 finances.


How to Begin Financial Tracking
Truthfully, setting up and using The PFP Financial Tracker is easy. There are a few simple rules to follow, and only the bare minimum of Microsoft Excel knowledge is required. From my perspective, many of us struggle to pull ourselves together and consistently prioritize financial tracking.
With that, take this Substack as guidance on how to begin tracking, and motivation on why you should continue. Don't deny financial tracking without giving it a fair shot first.
In this edition of The Personal Finance Project Newsletter:
Starting with The PFP Financial Tracker.
Light Work - Going through the motions of financial tracking.
Moving Forward - Growing into a financial tracking pro.
“Where Do I Begin?”
First, download the most recent PFP Financial Tools here:
Note that as the PFP grows, so will the financial tools. If you feel inclined, you can always download the most updated version here.
Downloaded?? Good work. Now find the tab (along the bottom) named Tracker Steps + Template and read through the 7-step infographic. For simplicity, you can consider this Substack as a beefed-up version of the infographic. Reading both will give you more than enough guidance.
Go ahead and follow Steps 1 and 2.
To name your tracker:
Right-click the Tracker #1 Tab.
Select Rename.
Name it January (or whatever month you are tracking).
Now that you have your own tracker, let me explain how it works.
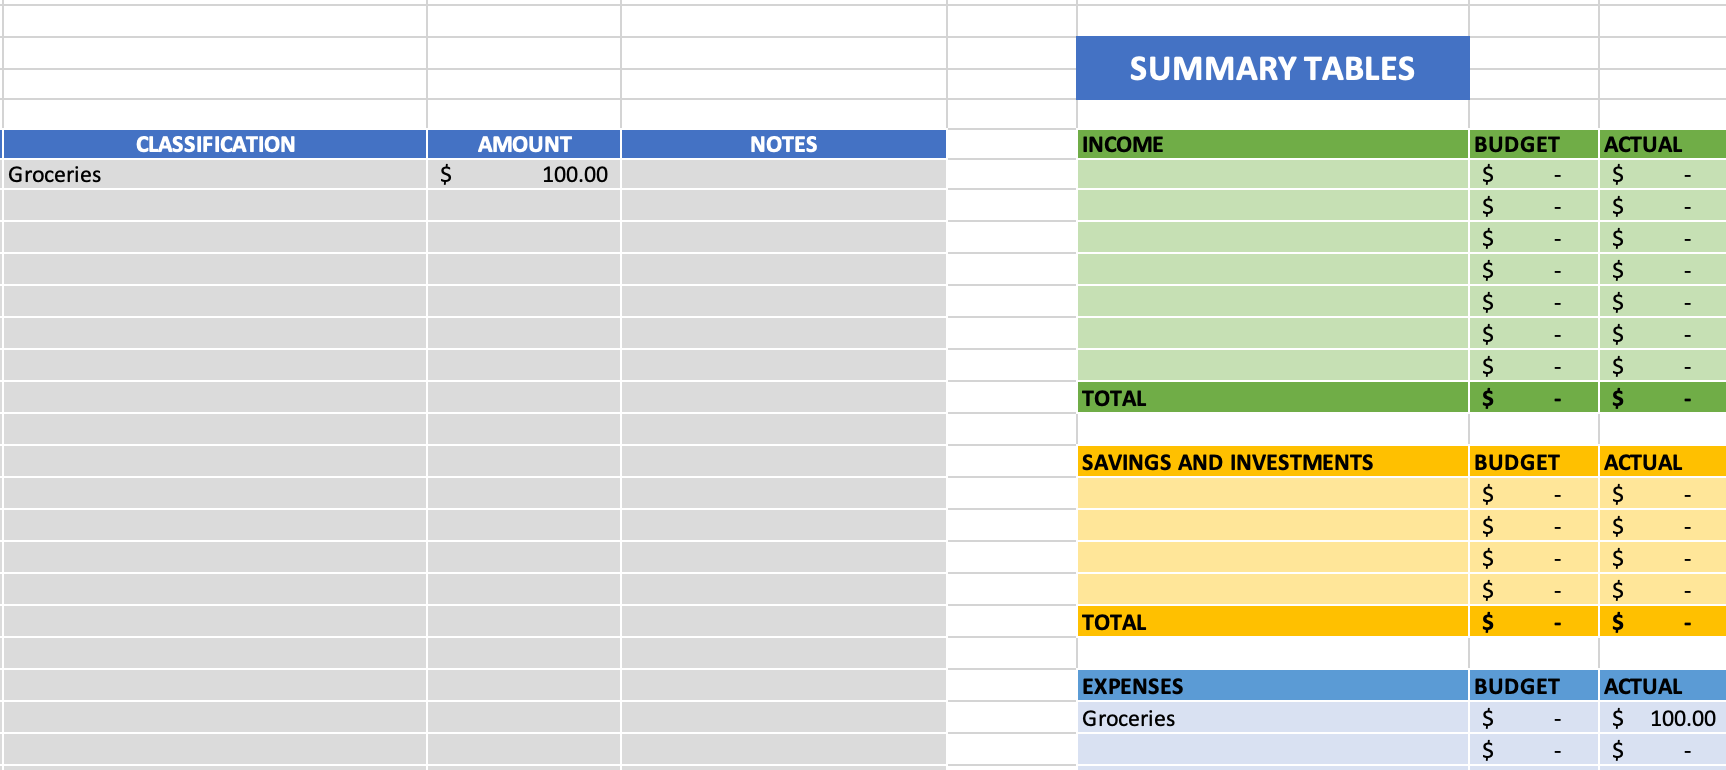
The ledger is a table where you will manually put your income, savings, and expense transactions. On the ledger, the Date and Amount columns are pretty self-explanatory. Consider Purchase Description as a simple title for your entry - “Loblaws Groceries” or “Skiing Day Pass” are simple and explanatory titles. And finally, the Classification column is the connecting piece between the ledger and the summary tables.
With the summary tables, the name says it all. This is where your ledger entries will be summarized according to the classification you gave the entries on the ledger. The idea is that, before you begin tracking, you will go through the Income, Savings, and Expenses tables and add labels (or classifications) to your common cash flows for each category.
But before you begin inputting your own labels, try this follow-along example.
Follow-Along Example:
Under expenses, enter the label “Groceries”

On the ledger, input the Date, Purchase Description, and Amount as shown below.

In the classification column of your first ledger entry, type “Groceries”.
Repeat the same steps, but this time on the second line of the ledger.

Going Through The Motions
Alrighty, now that that’s clear, let’s personalize the tracker.
Take a few minutes to think about your typical monthly expenses. What are your most common expenses? And your most consistent ones? How many subscriptions do you have? How much do you party? Or eat out/order take-out?
Decide on the labels (classifications) you want to use for these transactions, and put them in the expenses summary table.
Here are some common examples (pulled from my own tracker).

Ideally, you come up with classifications that best align with your spending. For now, feel free to start with mine.
For the income table, list all your sources of incoming cash (full-time or part-time employment, allowance, OSAP, tax returns… all sources!)
For the savings table, list the account(s) in which you save money.
Now that the classifications are listed, it’s time to Set the Stage (step 4 on the infographic). Consider the different accounts that you spend money from - this may be one or more chequing accounts or credit cards. Open up a new tab for each of these accounts so that you have all transactions on hand. Split the screen - one side with the account tabs and the other with the tracker - and now you’re ready to start tracking!
What about cash?
Many people decide to view cash as an exception to tracking. It's up to you to decide how responsibly and diligently you want to track your spending. If you withdraw cash from your chequing account, it’ll be on your account statement and should probably be recorded on the tracker as well.
Personally, I either save my cash or deposit it into my chequing account, so that each transaction with that money is listed on my account statement, that way I can record it all.
Once everything is set up, the actual tracking part is utterly simple. Put on some good tunes, grab a coffee, and pick away at your transactions. Before you know it, everything will be recorded and summarized.
One last thing - credit statement(s).
Unfortunately, the dates of your credit period most likely do not match a monthly calendar. This means that the credit statement - which is delivered at the end of the credit period - will be posted sometime during your tracking period. The dates won’t align, but don’t sweat it!
My approach is to take the credit statement info and add it to the credit statement summary table as I receive it. By using this table you will know the most important information - the new balance payment due date.
If you have two credit cards, copy and paste a duplicate table beside the existing one. Even though the credit period dates won’t match for the two credit cards, simply updating the credit info brings awareness to the payment due date.
Interest Charges?
Are you being charged interest? Don’t forget that this is the expense of holding debt, and it should be recorded in the financial tracker!
Classification = Interest Charges.
Growing with your Tracker
Here’s a little checklist you can use at the end of every month.
All transactions (income, savings, and expenses) are listed on the ledger.
All classifications on the ledger match a classification in summary tables.
The credit statement table is filled out - and any interest charge is recorded on the ledger.
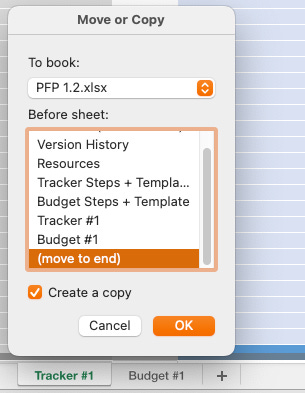
Once this is complete, you can create a copy of the January tracker and prepare it for February tracking.
You can make a new copy by right-clicking > Move or Copy > selecting (move to end) and create a copy > OK. (Pictured).
Alternatively, this video shows you how to quickly copy a page.
Once you’ve made the copy, keep the summary tables and erase all of the ledger entries.
As you continue financial tracking you may notice that the original classification lists may not cover all of your transactions. There may be a better way to classify certain expenses, or you may need to add a new classification altogether.
No problemo!
You always have the freedom to edit your classification lists, just remember these important reminders.
If you delete a classification from the summary tables, make sure that any transactions in the ledger with that deleted classification are updated to an existing classification.
Be consistent in your classifications, especially within each month's tracker.
More on consistency - an example.
For years I have been using the classification Take out/Eat out/Order-in. Coffee always fell under this classification. In the middle of 2022, I realized that lumping in my coffee purchases with all other food purchases may not be the most accurate, and I wanted to know how much I’ve been spending on coffee in specific.
I questioned whether I should add the coffee classification immediately, or wait for the next month. I also didn’t know if I should go back into previous trackers and update the coffee transactions to a new classification, or if I should just use the new classification moving forward.
It was up to me to decide how meticulous I wanted to be with this change. I decided to take it easy (a rarity for my particular brain) and just begin using the new classification next month. Before this change, coffee was included in Take out/Eat out/Order-in. After the change, it is recorded as Coffee.
I am a huge fan of accuracy, yet even I suggest you take this same approach. When looking back at old trackers you’ll just have to consider when classification changes were made. This is better than uprooting past trackers.
PRO TIP
When you add a new classification, add a note about it on your tracker. As you look back you’ll be able to see the changes you’ve made over time, and you can be consistent with your classifications moving forward.
Plus, after even just a couple of months of tracking, your classification lists will be tailored to you and may not require any changes. This will make tracking even faster and easier!
Your Financial Tracking Future
I usually do my financial tracking only a handful of times per month. For me, it just depends on the transaction volume in that month - if there are a lot of transactions I update my tracker more often. Each time I update my tracker, it takes me maybe 20 minutes, give or take. That's a small time commitment for such a valuable outcome.
“Financial Tracking is a lot of work”
Sound like you? Get off TikTok and use your time better. 🤷♂️ 1.5 hours/month of financial tracking instead of TikToking can change your life. (Plus, that app is trash).
As you grow, your tracker may need to grow too. You may notice that you want more info out of your tracker, or that you could display the information better. I encourage you to personalize your tracker and use it to your advantage.
The Add-On Suite is a place where you can copy and paste powerful add-ons to your tracker. These add-ons can help display new info, improve tracking accuracy, track account balances, you name it! Over time the suite will grow, but in the meantime try your own design or reach out and we can throw something together.
Happy Tracking!
Honestly, I hesitated to write such a detailed piece on financial tracking since using the tracker is so simple. I decided to publish this because I figured some of my readers would find value in a detailed explanation.
If you found this redundant or over-explanatory I suggest just opening the tracker and playing around with it! I have 100% confidence that all my readers can figure this out, even without my help.
Until next time! 👋